Products About Me Home Classroom Freebies TeachersPayTeachers Pinterest Email Facebook Image Map

December 12, 2013

Holiday Speech Craftivity

This holiday season I am trying to incorporate more crafts so that the kids actually get to make something to take home. In the past I have often cringed at doing artsy projects since I was always worried that precious speech time would get wasted gluing/cutting, etc., so I am trying to find crafts that involve fewer of these components. After scouring the internet, I found a really cute little project: beaded wreath ornaments! I thought I'd share how I used this idea to maximize productions during our session. 
Wreath ornaments.
First off, you will need to gather the materials (all of them are available on amazon.com): 
  • red chenille  stems (pipe cleaner)
  • green tri-beads 
  • red or white (or both) round faceted beads (mine were 8mm)
  • little silver and golden bells
  • wire
Next, I prepared two different types of "gift tags" to be attached to the ornament at the end. For these, I typed a message in Microsoft Word, printed it out, and glued it on a die-cut tree shape. One tag was for my artic students, and one for those working on language/fluency targets:
Artic & Language gift tags.
I also created "visual instructions" for my younger students, so that they could grasp the pattern of the beading.
Visual instructions.
Now we were ready to get started! Each student was required to "earn" their beads. The price per bead was either 10 productions of a target word or a language-based activity (e.g., answering a Wh-question, providing a descriptive detail about a picture, making a sentence about a verb card, and so on). The patterning for these wreaths consists of 3 green tri beads followed by a round faceted bead. My wreaths had 5 faceted beads each until we attached the bell.

Since each wreath consists of about 23 beads (you can add more if desired), I got about 230 productions out of each artic student. To make sure we could get this done in a 30 minute session, I had larger groups practice chorally in unison. As they earned their beads, they got to string it onto the pipe cleaner. This was a nice opportunity for my younger students to work on sequencing and patterning as well.
One of my Kindergarteners at work.
All of my students (including preschoolers) were able to master the fine motor component of this project (I should note that I have not done this with my lower functioning SDC kids, many of whom have OT services) and had a lot of fun. One of my 1st grade artic students even noted, "I wish we could do this every week instead of work." 

As the very last step, I helped the kids tie a bow at the top (all of them needed help with this part) and attach the gift tag to the the ornament.
The finished product!
At the end the kids got to take it home! Definitely a quick and fun activity to get into the holiday spirit. I surely will be doing this again (or something similar) next year!
~Viola

December 5, 2013

TpT Freebie: Holiday Articulation Dots

My TpT Freebie this month is an articulation craftivity similar to the Jack-O-Lantern project that I did with my students back in October. You will get a pre-made template featuring a Gingerbread man to let your students practice their speech sounds while coloring in the picture dot-by-dot. My students had a lot of fun with this, so I wanted to make sure to make it available to everyone. You can download it here.

Holiday Articulation Dots - get it here.
~Viola

November 30, 2013

Using Address Labels For Collecting Data

I have been meaning to write this post since starting this blog, but I am just now getting around to it. One of the aspects of being an SLP that is constantly evolving for me is the way I keep and collect my data. Since data collection is such an integral part of our jobs, it is important to develop an efficient way to do so. I think everyone has their own way that works for them and it takes a lot of trial and error to figure out what that best way is. I wanted to devote a quick post to the evolution of my own data collection methods.

When I first started working in the schools, each of my students had an individual folder that held their data sheets and goals. The main reason I did it this way was because this was the system my master clinician used during my internship. Even though the folders were color coded (e.g., Yellow for all the Monday kids, Orange for all the Tuesday kids, Purple for all the kids who see me more than once a week, etc.) I found that this method didn't really work for me -- there was too much wasted time in having to find the right folders, getting the papers out, shuffling the progress sheets around trying to get data down onto the right page, and then getting the papers back into the right folders. After about one year of this process I abandoned the idea of individual folders and moved to a binder system.

I subsequently made two binders, one big one for all of my regular ed kids, and one smaller one for my SDC students. I bought tabs to divide the binders into sections for each student (alphabetically organized by the students' last names). Each tab then contained the data sheets for the student. 

My Speech Binder.
3 rows of tabs inside.
While I really liked having all of the sheets accessible in one single place, I found that I always seemed to scramble getting data down in the right section. Because of this, I eventually started taking data onto Post it notes. The major pitfall with this strategy was that I had to transfer the data from the post it notes into my binder at the end of the day, which in turn took forever -- resulting in wasted time I didn't have. This year I finally discovered my magic elixir to eliminate this problem : Avery address labels.

Now I simply stick a sheet of sticky labels onto my clipboard and record any data onto them (each label is marked with student initials so I know whose label belongs to whom).


Avery address label data collection.

This is what it looks like up close.
At the end of the day, I simply have to flip through my binder, record the date and what we did, and stick the label into the progress section and add a little note if needed.

Major time saver!
So far, this is the system that seems to work best for me. However, I would be surprised if my ways won't change again. Like I said, trial and error!
~Viola

November 21, 2013

Using visual cues to work on play-based turn-taking

Phew, between progress reports, parent-teacher conferences, and frantic attempts to cram as many groups as possible into our shortened minimum days, I completely managed to neglect this blog over the last few days. Now that Thanksgiving break is around the corner, things are finally calming down a bit. Time for an update!

I thought I would write about a specific approach that I used with one of my lower functioning ASD students to teach play-based turn-taking skills. With the rise in children diagnosed with Autism Spectrum Disorders we all have students working on social goals. This is an area that most of us do not feel super comfortable with since there seems to be a distinct lack of instruction on this topic in graduate school. In addition, often parents want to see playground/recess-based goals, which aren't always appropriate. I think parents don't understand that this type of outdoor play is extremely unstructured and overwhelming -- it is my belief that these kids need to master the skill in a highly structured environment first before we can take it outside. Also, I don't make it out on the playground as often as I want to, which makes it difficult to work on these goals with the necessary rigor.

Anyway, my student is a 3rd grade student attending our special day class. He has been diagnosed with ASD at an early age. Although he is verbal, his utterances are limited to delayed echolalia, refusal, and requesting desired items. His MLU is about 3-4. There is not much intrinsic motivation to engage in social activities or initiate conversations or other verbal exchanges. Of course, as with most parents of our ASD students, there was a push to include social goals in addition to language targets. During our sessions I noticed that although the student is able to adhere to rules of a simple game, he needed constant verbal prompting for each step in order to recognize when it was his turn, initiate, and then follow through with his turn. Because we often play games while working on our speech goals, I figured that this was something I could easily work on in the speech setting while practicing the rest of our targets. The goal I ended up drafting was as follows:

By (date), given an age-appropriate turn taking activity (i.e. a board game) with a peer or staff member, (student) will initiate his turn and follow through with it, with visual prompts only, 4/5 trials, in a structured setting, as measured by SLP observation and tally.
 
I selected three high interest target games and created three sets of visual prompts:

1. A choice board depicting the game selection and a sentence frame:

2. On the back of this card, I placed a visual reminder of "My turn":

3. I then continued to create visual rules for each of the three games:

It only took a few sessions for the student to learn to request a game appropriately and master the rules. If he did not initiate a turn, I briefly flashed or tapped the "My Turn" cue which sufficed to get him started. If he did not follow through with a turn, I tapped the specific rule. This approach really helped my little guy and by the end of the year he had gotten a lot better with turn-initiation (although we weren't able to completely fade out the "My Turn" visual). I think it is important though to see the growth and improvement with these students, even if it comes in small steps and minute increments...
~Viola

November 10, 2013

TpT Freebie: Idiomatic Expressions Checklist

With the rise of Autism Spectrum Disorders I have more and more students each year who struggle with figurative language. My TpT Freebie for November is a checklist containing a large variety of common idiomatic expressions that our students may come across in different settings. I made this to help me assess which idioms my students are already familiar with and which ones they still need to master. Of course this list is not comprehensive, but it is a start. You can make checks in different colors (e.g., green for mastered, red for expressions that are not mastered) to help you visually organize your targets.
Idiomatic Expressions Checklist - get it here
I have also sent this list home with parents and asked for their input as to which expressions they would like me to work on. I hope you find this helpful!
~Viola

November 7, 2013

Vocalic /r/ -- tURkey wORds

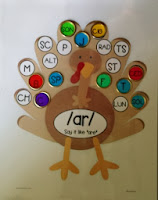
A lot of my /r/ students do well on their target sound until we hit vocalic /r/, so I decided to try and make a little fun activity for them. Using the theme of Thanksgiving and some clipart, I made a bunch of turkey visuals to work on that skill. Here is what one of them looks like:
Vocalic /r/ turkey.
Students are expected to blend a variety of onsets with particular vocalic /r/ word endings to create and record new words. What I like about this activity is that there is lots of repetition of the same type of vocalic /r/ and it works on phonological awareness skills, as well. (I quickly realized that this activity worked best with students who only had articulation deficits, those with language delays needed a lot more prompting and help.)

After generating and practicing a specific word, students then recorded the word on a worksheet. I told them that spelling didn't matter as long as they practiced it the right way. With some of my older students we talked about different spellings of the same word (e.g., pear vs. pair) and discussed the meaning of each. 

One of my hard-working 3rd graders.
When they were done with each word, students got to cross it out (using a re-usable dry erase pouch). Halfway through creating this activity I realized that Chipper Chat tokens fit perfectly onto the circles, too. This was not intended, just a really fortunate coincidence.
Crossing out words we found.
Happy coincidence!
I have made this activity available on TpT here. Hopefully my students will be able to say that they had "tURkey", not "tAWkey" for Thanksgiving dinner!
~Viola

November 5, 2013

Using Story-Grammar-Marker to Teach Social Skills

Last week our district was fortunate enough to have a speaker from Social Thinking come to do a presentation for our staff. The title of our training was "Implementing Social Thinking Concepts and Vocabulary". I was already familiar with many of the ideas discussed since I own several of Michelle Garcia Winner's publications, but it was nice to hear someone talk about the concepts rather than reading about them. The one thing that I took away from the presentation was an idea that I thought was so clever that I wanted to share it on this blog.

The presenter spent some time talking about Story-Grammar-Marker and its value when teaching story comprehension. She then suggested that SGM can also be used for social problem solving to review good choices versus bad choices. I typed up an example in my homemade adapted SGM template (sadly I don't own the program, only the braid and some posters) to demonstrate this idea:

Click to enlarge.
I just thought it was a really novel spin on social stories! And if you are already using SGM with students to target story comprehension this might be an easily adaptable way to talk about social skills with them as well.
~Viola

October 30, 2013

Halloween Treats

I am being a kind SLP this year by handing out small Halloween treats to all of my students. I picked up some candy (all peanut free!) and small items at Walmart and put them together in a small party bag. (I had checked prior to this with the parents of students with known food allergies.)

Making the treat bags!

In our session, we spent some time talking about the phrase "Trick or Treat", and especially the difference between "tricks" and "treats" and the meaning of each word. I was baffled at how many kids thought "tricks" were something positive in this context! The meaning of the phrase was lost on many of them, so it created a great teaching moment. I then told them that because it was Halloween, Ned (the chief item from the game "What's in Ned's Head?") had stuck a bunch of bones in his head. Each bone had either the word "Trick", or the word "Treat" written onto it.

Bones in Ned's Head.
Students then took turns fishing out bones from Ned's head, and received their treat bag when they found one that said "treat" (if they got tricked, they got another turn). Kind of a silly activity to take up the last 5 minutes of our session! And of course the kids really liked getting treats :).
~Viola

October 28, 2013

Spooky Mystery Items -- Halloween Guessing Game

A trip to the Dollar Store inspired me to create a Halloween activity for my Speech students to work on inferencing skills (although it is adaptable for articulation, as well). I found these cute boxes for $1/pair:

Dollar Tree finds!
I ended up buying a bunch of them with the intent to use them in therapy. I didn't have any ideas about what exactly to do with them at the time, but it didn't take long to come up with something. In addition to these boxes I also found a lot of other gross / spooky stuff at the Dollar store, including spider webs, bones, fake teeth, fake blood, etc. I figured that all these goods would lend themselves to a creepy guessing game. With this concept in mind, I started creating clues for each of the items and printed them on some cardstock:

I wrote 3 clues about each item

Next, I stuck the clues onto the lids of the Halloween boxes and placed the matching object inside of the box. When my students arrived to therapy they had to guess the contents of each box based on the clues that were provided.

Hmmm...what could be inside?
Gravestones, a snake, and goblin snot!
This worked well for some of my older articulation students, too. I simply had them read the clues out loud with their best speech, and had them do some targeted practice of the words that contained their sound. They had a lot of fun! Amazing, how much more motivated students seem to become with themed activities like this. I am already looking forward to the holidays!
~Viola

October 25, 2013

Speech Jeopardy

One of my favorite whole-group activities to do with my Speech students is Jeopardy -- I have modified this game to target different goal areas / age groups. I have made Artic Jeopardies, Language Jeopardies, SDC Jeopardies, ... the options are endless. Technically speaking it is not really "Jeopardy", since I do not require my students to answer in question format. It is more of a quiz show type competition. Since my students really enjoy this activity (and if they enjoy something, they will work hard!), I thought I would devote a blog post to it.

I have made and accumulated several Jeopardy versions to target different goal areas (I think I have around 6 different /r/ game templates) and am starting to transfer them into an electronic format so that I can make them available to other SLPs through TpT. Making them is quite an involved process, however, the good news is, once they are made, you can re-use them over and over.

I most recently made a language Jeopardy for my 2nd-3rd grade Special Day Class that we played today. The difficulty level of the questions is appropriate for regular education Preschool / Kindergarten students, as well. The categories I incorporated are relatively simple, and match the goal areas my students have been working on in therapy (prepositions, categories, opposites, inferencing, and emotions). Once I was sure of the categories I wanted to use, I came up with five questions for each and typed them up, along with a header for each question type. At this stage I also decided on a point value for each question -- the easier questions are worth fewer points, whereas the harder questions are worth more points. I also made sure to incorporate "Double Jeopardy" questions (worth twice the points!). Then, I printed this whole mess!

At this stage, my project looked something like this:
The early stages! Note that you will also need scissors, 5x8" note cards, and glue.
The next stage entails gluing the questions onto one side of the note card, and the corresponding point value onto the other side (make sure the colors match!).
Side one.
Side two.
I also glue the headers onto some construction paper of a like color. It makes them look nice and at the same time more durable. The last step (although optional) is to laminate each item -- that way your game will last a long time.

Laminated/finished game.

Once you are ready to play the game, you will have to set it up by taping/pinning the categories and questions in a visible place (usually the whiteboard works).

Jeopardy cards taped onto the whiteboard.
Now for the fun part! I have come up with two variations to play this game:

Version 1 (my preferred for SDC groups or younger students)
1. This version allows students to play versus the teacher / SLP.
2. Students take turns choosing a category / point value (e.g., Opposites 300).
3. The question is read out loud.
4. Students then have to come up with the correct answer as a team. (Or you can take turns calling on them until someone gets it right, which is what I usually do).
5. If someone knows the answer, they get the points. If they do not know the answer, the teacher/SLP gets the points.
6.Whoever has the most points at the end is the winner!

Version 2 (my preferred for older students):
1.Divide students into teams.
2.On their turn, a team gets to decide on a category and point value. 
3. The question is read out loud. 
4. The team has to collaborate thinking of the correct answer -- no blurting out or they lose their turn!
5. If the team answers correctly, the team gets the points. If the answer is incorrect, the other team gets a shot. Teams take turns picking questions.
6.The team with the most points wins.

A rule for both variations: Questions with stars on them are "Double Jeopardy" cards and worth twice the points.
An example of a Double Jeopardy card.
For Articulation Jeopardy, all of the answers have the target sound in them. After they answer correctly, all of the students have to chorally practice the target word x number of times. Like I said, this activity is very adaptable.

If you choose to make your own Jeopardy game, the first step is to think up five categories that you want to use. Next, you have to come up with five questions for each category. Once you have your categories / questions thought up, you will have to transfer them onto index cards. On the back of each index card, you assign a point value (100-500 for each category). Make sure that easier questions have a lower value. I have a free Jeopardy Number template available in my TpT store here. You also need to make a header for each category that you have chosen. 

If you would prefer to save yourself the work and buy one of my templates, I currently have a Language Jeopardy (appropriate for 2nd-3rd graders working on Language goals) and the SDC/Preschool/Kindergarten Language Jeopardy game described above available on TpT.

The reason I love Jeopardy so much is that it allows you to see a lot of students at once. This is especially helpful when you are trying to make up missed sessions for several students. In addition, this activity is great for promoting cooperative / team skills in your classroom in addition to building speech and language skills. While the preparation takes some effort, once the cards are made you can laminate them for durability and reuse it every year! Win!
~Viola

October 19, 2013

Jack O'Lantern Articulation Activity

This year I am trying to incorporate more seasonal activities in therapy, because the kids really seem to like it. Fortunately my school has not yet banned Halloween, so it's fair game :). This week my students got to make a cute articulation project with Jack O'Lantern pictures. I adapted this activity from a similar one that I saw on Pinterest a while back, and the best part is that it is super easy to make (and - more importantly - cheap!). 

You will need: 
* Cardstock
* Computer and printer
* Tempera paint (fall colors - orange, yellow, brown, red)
* Paint palette
* Q-tips

How to do it:
1. Find a Jack O'Lantern coloring page online and save the picture to your computer.
2. Open the picture in Microsoft Word.
3. On the bottom of the page, insert a textbox with the words: "For each dot, I practiced my Speech sound."
4. Print this page onto cardstock or other thick paper.
5. Give a copy to each student.
6. Put paint onto a palette.
7. Have students dip Q-tips into the paint and make dots onto the page.
8. Every time they make a dot, they say a target word.

One of my Kindergarteners made a rainbow pumpkin!
I got tons of productions out of my students with this activity! This worked especially well with students who were able to practice independently while I worked with another student. I had some overachievers who insisted on covering every white space on their paper, and they worked extra hard. Some other students needed prompts to not just rapidly dot, but to make sure to really just place one dot per sound production. But for the most part, this activity was a success!

The finished product.
I don't often do artsy projects, so a lot of my kids considered this to be a special treat and were really motivated. And they got to take it home after the pumpkins dried. I am planning to do this again around Christmas time, perhaps with a Christmas tree and ornaments? Fun times!
~Viola

October 15, 2013

Halloween-themed books - Companion Packs

Over the weekend I worked on two more companion packs for Halloween-themed books, because I needed sequencing cards for these stories. I have to honestly say that I feel much more motivated to create these types of materials now that I have a TpT store. Before then, I didn't want to put in all this effort if I was the only one who was going to be using the materials. 

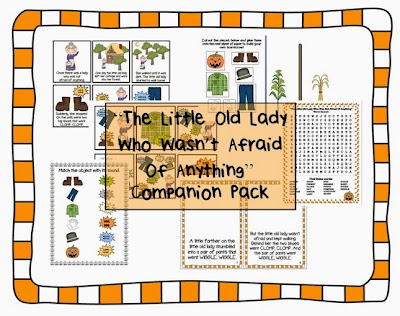
I was planning on reading "The Little Old Lady Who Wasn't Afraid of Anything" with several of my groups, since it is such a great story to work on sequencing. And since I already had a lot of Halloween clipart I decided to make something for "Scary, Scary Halloween", as well. What is nice about this book is that the text is simple enough where my lower functioning students are able to follow, and it is short enough to keep their attention. Anyway, here is a brief overview: 

Available here.

This pack contains sequencing cards (with and without text), a scarecrow building activity, a matching worksheet, make your own story book handouts (can use in conjunction with the sequencing cards to cut and paste), and a word search.

Available here.

This pack contains sequencing cards (without text), comprehension cards, four different pre-led writing activities, and a make your own story book handouts (can use in conjunction with the sequencing cards to cut and paste).

Also, if there is anything in particular you are looking for for either of these books, let me know and I will consider making it and adding it into the packets. I love getting new ideas!

I have a few more spooky Halloween activities planned with my therapy groups, so please stay posted!
~Viola

October 14, 2013

Game Review: "On the Farm" by Ravensburger

"On the Farm" by Ravensburger
Disclaimer: This post contains affiliate links.

One of my favorite game brands is Ravensburger - I can always rely on their products being a high quality material that is fun and will last for years (I still have some of their games from when I was a kid). I recently received a generous game donation of On The Farm, a game that is geared towards the younger clientele, and is part of the company's "Imagine-Play-Discover" series. It turns out that despite the recommended age range of 2 & up the game is a great tool for speech & language therapy, so a review is in order!

While the box states that this game is for 1-2 players, I have found this number to be arbitrary as this game can be easily adapted for therapy groups. The game is advertised to build skills in the areas of vocabulary, associations, deduction, as well as creative play. The game pieces are made of thick, sturdy cardboard for durability and consist of a base, barn, roof, and playing pieces that include a variety of farm animals, vehicles, and farm workers.

Preparation: Players first need to construct the 3-D barn in order to get ready for play, which is easy for an adult, but takes some problem solving skills for a child (my language-delayed Kindergarten student needed to be clued into where the bottom of the barn could fit into the holes of the base). The barn is very colorful and contains illustrations of animals and other things you would find in a barn. You can spend some time talking about the objects and work on some deduction as well (e.g., Why do you think there is a ladder? What is the hay for? Why are there tire tracks in the grass? etc.). Even the windows and the door are part of the puzzle and can be removed/opened.

Game Play: The instruction booklet provides a number of suggestions on how to adapt game play. (1) For younger children, you can have the child complete the puzzle and ask basic questions about the farm and its components (e.g., "What animal is it? Where is the tractor parked? "etc.). You can then use the pieces to let the child engage in free play. This strategy would be great for working on basic Vocabulary / Animal noises. (2) For younger children, the adult can hold up a game piece and ask questions such as, "What is it? What noise does it make? Where does it belong?" and have the child subsequently places the figure with its counterpart in the barn. This is a great way to work on Matching. (3) For older children, you can place the game pieces in and around the barn. Then have the child close their eyes, and switch / take pieces away. They will then have to guess what has changed. This is great for working on Memory skills.

There are multiple other ways in which the game can be adapted to work on speech/language/critical thinking skills. Here are some of the ideas I came up with:

Sequencing: You can work on very basic sequencing skills when setting up the barn. Ask questions like, "What do we need to build first? What comes next? Which part is last?" My students had a good time setting up the barn!
Sequencing - after we put down the base, we build the walls. Last, we put on the roof!
Mom is coming through the door!

Following Directions / Positional Concepts: What makes this game a great tool for working on following directions with embedded positional concepts is that the barnhouse has a distinctive front and backside. In addition, the many details on the barn and game tokens allow for added complexity. Because the door and windows are removable, you can use the barn to work on some more advanced concepts, such as "through".


Problem Solving: We worked on some basic problem solving too, by placing objects in "silly" locations, such as putting the tractor "on top" of the barn. This in turn allowed for some great questions - "How did the tractor get on the roof? Could this really happen? What would happen to the roof?"
Could this really happen?
Sorting: Because the game pieces are from a variety of categories, you could have students work on sorting and have them group animals, persons, and vehicles. You could even increase the complexity of this task by instructing students to place all the people inside, the animals next to, and the vehicles behind the barn.

Pretend Play: Last but not least, this game can be used for pretend play. And the best part is that unlike a dollhouse, it folds neatly back into a box at the end of the day. 

"On the Farm" would make an excellent game for preschool and early intervention speech therapists, but is also a valuable resource for those of us working with lower cognitive functioning students. Or, if you have young children of your own, you could get it as an early Christmas gift for them. As for me, I can never have enough hands-on materials to work on following directions with my students! This is definitely a great addition to my repertoire, and knowing that it's from Ravensburger, I know it will likely last me for a while. "On the Farm" is available on Amazon. Go check it out!
~Viola

October 9, 2013

Book Review: How Katie Got a Voice (and a cool new nickname) by Patricia L. Mervine
Cover Art
Title: "How Katie Got a Voice (and a cool new nickname)"
Author: Patricia L. Mervine, M.A., CCC-SLP
Illustrator: Ian Acker
Publisher: Trafford Publishing, 2012

I had the honor of being asked by Patricia L. Mervine to review her book, "How Katie Got a Voice (and a cool new nickname)" in observance of International AAC Awareness month. For those of you who aren't aware, Pat is the moderator of the website Speaking of Speech, an invaluable resource for SLPs.

The story follows the narrator, Miguel, who is a student at Cherry Street Elementary. He and the other students at his school celebrate each others' differences and idiosyncrasies by holding a nickname that speaks to their unique skills. For example, Brandon, who collects bugs, is lovingly known as 'Bugsy', Giovanni, who likes to tell jokes is called, 'The Jokester', and so on. Miguel and his classmates are thrown for a loop when a new student, Katie, joins their fourth grade classroom. Katie is different from her peers in that she is wheelchair-bound, can't move her arms or legs, and can't say any words. Katie gets by with the help of her one on one aide and her low-tech communication book. Although Miguel and his classmates have a desire to include Katie in their daily activities, they are struggling to figure out how to do so successfully due to her disability. This is when the school's SLP comes to the rescue...  with her help, Katie soon learns how to communicate using an electronic AAC device and the author cleverly illustrates how Katie is able to emulate all of the special skills of her classmates using her newfound tool. In the end, Katie receives her very own nickname -- I won't tell what it is - I don't want to spoil the surprise :). 

"How Katie Got a Voice" is a heartwarming story about acceptance and individual differences, and is a great tool for promoting AAC awareness and tolerance. This makes it a wonderful story to read with students, especially if you have AAC users at your site.

This book is available for purchase directly from the SoS website ($16 includes S&H and an autograph) and on Amazon ($17.61 + S&H) And for all of you tablet fans out there, there are versions for iPad and Kindle available, as well.

So far I have read this book with two of my groups in speech therapy: one group consisted of four 4th/5th graders with language goals, and the second group consisted of four 3rd/5th graders with articulation goals. We do not have any AAC users at our school, so it was a novel concept to them, and a positive way to build their awareness of this population. We talked about how despite Katie's physical limitations she is still aware of her surroundings and we spent a lot of time discussing how it might feel being unable to communicate effectively.

I prepared a short activity to illustrate the point: I brought index cards, each of which had a Boardmaker picture and a basic need written onto it, for example, "I am thirsty", "I have a stomachache", "I want candy" (okay, this may no be a basic need for most, but it is for me!), etc. Each student then took turns pretending to be Katie: they looked at one of the cards and then had to communicate to their peers what they needed without using gestures or their words. They were only allowed to smile, blink, turn their heads, and grunt. This is where I made an interesting observation: the students with language deficits just sat there, looking helpless and awkward. They simply had no clue how to possibly get the point across. On the other hand, my articulation students with average language skills devised some really clever strategies: one student tried to communicate "I am thirsty" by intently staring at the blue shirt of her peer. Another student attempted to communicate "I want candy" by staring at the "Granny's Candies" game on my shelf. Despite these students' creativity, none of them was able to get their peers to guess what they needed. This activity was a great way of illustrating the frustrations of communicative limitations.

The story was received well by my students, they asked thoughtful questions and afterwards I felt I had successfully broadened their view of the world. We discussed that throughout their lifespans they would likely come across individuals like Katie, and should meet them with patience and kindness.

If you are planning to read this book with your students, I would recommend that you allot approximately 45-60 minutes to allow for sufficient discussion time. I had initially planned on 30 minutes, but it was barely enough time to read the book (especially with my language group, since there are focus issues and redirection was needed), so we extended our session. Also, including an activity as I did will be helpful to those students who are unable to focus for extended periods of time. We took a small break from reading the book to do the activity around the point where Katie was introduced and her classmates were unsure of how to include her.

There are additional resources related to this book available on Pat's website, including a discussion guide that I used to jumpstart some of the conversations with my students. "How Katie Got a Voice" is definitely a book that shouldn't be missing from an SLPs library.
~Viola