Products About Me Home Classroom Freebies TeachersPayTeachers Pinterest Email Facebook Image Map

December 27, 2014

The Elf on the Shelf -- Part 2

Before the holidays have completely wound down, I wanted to share the last tricks our elf Peppermint played on my speech students this month. This was my first year doing Elf on the Shelf and I had even non-Speech students stop by to see what the elf had done - word of mouth apparently travels fast!

December 8th: Peppermint decided to eat a little snack.
December 9th: Peppermint hid 6 candy canes around the speech room and challenged students to find them all. This was a fun hide and seek game that the kids really enjoyed.
December 10th: Peppermint got into the Lego box and decided to create his own Christmas tree.

December 11th: Who knows what Peppermint did? I was out sick that day.
December 12th: Peppermint got into the marshmallow bag.
December 15th: Peppermint decided to take a little nap.
December 16th: Peppermint used marshmallows to make a snow / marshmallow angel.

December 17th: Peppermint made a paper chain and posted a sign next to it that read: "Count the links in the chain to find out how many days are left until Santa comes."
December 18th: Peppermint shared his generous holiday spirit by offering a lollipop to all my students.


December 19th: Peppermint pranked my students by putting Santa hats on the characters of our feelings posters.


I don't know whether Peppermint will return next year... it was a lot of work keeping up with him! But we will see, the kids definitely enjoyed his visit...
~Viola

December 24, 2014

Icicle Christmas Ornaments

The completed ornament.
Around the holidays, I always like doing a craft project for the students to bring home and give to their parents as a gift. Of course, with 50+ students on my caseload, it is always challenging to find something that is within my personal budget (i.e. under $30) and at the same time looks nice (i.e. won't go in the trash as soon as students come home). This year I opted for some neat beaded icicle ornaments. Fortunately I still had some beads left from last year's project, so the main investment was the tinsel pipe cleaners. You will need one pipe cleaner per student and aim for 20-30 beads per student.

Step-by-step instructions.
In order to make this activity therapeutic, I had students "earn" their beads. My artic students had to say a target word 10 times to earn a bead, and my language students had to complete a task specific to their goal (e.g., solve a problem solving scenario, formulate a grammatically correct sentence about a picture, tell a descriptive detail about an object, etc.). Students then got to string their beads onto the pipe cleaner until they had a decent amount. I found that even if we did not have enough time to fill the pipe cleaner to the top, the tinsel gaps still made it look beautiful. This was good, because students didn't have to feel pressured to complete the whole thing. Of course, I had some kids who tried to set the record. In the end, one of my artic students practiced her sound 52 times (that is 520 productions in a single session!). To save time, you can also have students who are working on the same sound practice their words chorally at the same time.

The rainbow versions were particularly striking!
Most of my students had no problems with the fine motor component of this task. If you work with younger students, I would recommend using pony beads (versus tri-beads), since they have bigger holes and are easier to string.


Once we had enough beads, we curled the pipe cleaner around a pencil, tied the tip, attached wire, and a gift tag. The tags read either, "For each bead I practiced my Speech sound 10 times" (Artic) or "For each bead, I practiced one of my Speech targets" (Language).

My students (and I!) were impressed at how well these ornaments turned out. Some kids opted for a pattern and others just strung random beads together. In all of the cases, the ornaments turned out beautiful. In addition, they were easy, fast, and affordable. I can't wait for next year's project! Happy Holidays!
~Viola

December 6, 2014

Speech Room Fun with the Elf on the Shelf

This week has been really exciting for my Speech students: for the first time we are having one of Santa's holiday elves visit our Speech room. Most of my students were already familiar with the Elf on the Shelf concept from home, and I told them that this one was probably sent to make sure they behave while at school. Our elf has been creating all sorts of chaos in our room, and I now have students stopping by even on their non-Speech days, because they want to see what the elf did this time. Here are some of the things that happened...
 December 1st: The elf arrived, wanting students to vote for  a name for him. Throughout the week, all the students got to choose their favorite. The votes are in, and it looks like "Peppermint" is the most popular!
December 2nd: Peppermint got into our bookshelf and thought it would be funny to turn all of the books upside down.

December 3rd: Peppermint showed off his acrobat skills when he decided to dangle upside down from the ceiling.

December 4th: Peppermint built himself a sled out of candy canes and went sledding in a marshmallow winter wonder land.
December 5th: Peppermint got into my sticker box and had some fun with its contents.


Stay tuned for more updates from Peppermint! I'm sure he has some more ideas of how to entertain us during the month of December!
~Viola

December 4, 2014

USAopoly Review: Treasure Trax

http://www.amazon.com/Treasure-Trax-All-In-One-Scavenger-Hunt/dp/B00BMEVEEY/ref=sr_1_1?ie=UTF8&qid=1417754586&sr=8-1&keywords=treasure+trax
Get it here!
Note: This post contains affiliate links.

Just in time for the holidays, I am reviewing some more games for promoting language development. One relatively new addition to my speech room is Treasure Trax, by USAopoly. This scavenger hunt-themed game is geared towards a younger crowd (ages 3 and up) and would be the perfect stocking stuffer for a parent with young children who love activities that require them to be on the move.

The game contains 60 sturdy square cardboard cards that are broken up as follows: 
Game components.
-- 30 location cards: These cards contain a picture of a place/item that is commonly found within and around a home: bed, doormat, dresser, sofa, vacuum, TV, tree, etc.
-- 18 search clue cards: These cards contain descriptive attributes -- either a color or a letter (A-H).
-- 12 animal cards: Each of these cards depicts a different animal.

The game also comes with a cute little cloth tote to store your cards in.

Prior to playing the game, an adult helper chooses 10 location cards, 5 search clues, and 5 animal cards. One location card is put aside (this is the place where the scavenger hunt will begin). At this chosen place, the helper places a search clue (e.g., card with the color 'blue'). An animal card is then hidden by an item that corresponds to the search clue (e.g., the lion card is hidden by a blue toy). In addition to the animal card, the next location card is left in this spot so that the child knows where to look next. The helper continues hiding the cards in this manner until they are all placed around the house.

To play, the child starts out at the first location card. They use the clues to find the next card until they have collected them all. For extra fun, the helper could place a little treasure or prize at the last location.

This game has a lot of educational components for young children, such as color identification, sound identification, and vocabulary. You can also work location concepts into play by asking the child where they found a particular card (e.g., under the table). And because of the movement component, this activity would be fabulous for active kids! The game duration is estimated at 10 minutes, which is about the attention span of many preschoolers.

Please note that this game will require an adult or older child to facilitate play (since someone has to set up the game by hiding the cards), which may make it challenging for two younger children to play independently.

I was really excited about this game, but found some limitations for my Speech room setting. Most of the location cards have items that are only found within a house and are nowhere near a classroom. I think another way to improve this game would be by adding different attributes (rather than letters A-H), such as "soft", "small", "cold", "squishy", "wet", etc. I think many pre-Kinders would have difficulty identifying items that start with a particular letter, which renders the letter cards useless.

With some finagling, I was able to pick out enough cards that matched my setting in order to play this game with some of my younger kids. They did really enjoy it! It was something different and they got to move around! I am definitely holding on to this game for the day I have kids of my own, so I can play it with them around the home ;).
~Viola

November 30, 2014

TPT Cyber Monday Sale December 1st-2nd

Don't miss out on this year's TPT sitewide Cyber Monday Sale! The sale will go from December 1st - December 2nd and you will get additional savings if you enter the promo code TPTCYBER at checkout. 

Of course I am participating, as well, along with thousands of other sellers! Please come visit my store, you never know when the next big sale date will be.
~Viola

November 24, 2014

Autumn Tree Craftivity


I have been swamped with IEPs and assessments over the last few weeks, so I did not have any time to come up with any involved Thanksgiving projects for my students. I did however celebrate the advent of fall with some of my articulation groups by making some autumn trees using the good ol' Q-tip trick. I used some free clipart that I found on TPT to create the tree template and had students practice a word with their sound before placing a leaf on their paper. This might make a good last minute fall project for those of you who are working this week. Happy Thanksgiving!
~Viola
November 8, 2014

Building Speech & Language Skills in the Kitchen

http://www.teacherspayteachers.com/Product/FREEBIE-Building-Speech-Language-Skills-in-the-Kitchen-Parent-handout-1544914I don't really have a lot of educational posts for parents on here, so I thought it may be high time to write one!

With Thanksgiving coming up, I have been encouraging my students' parents to involve their children in the cooking and meal preparation process. There are so many great opportunities to work on speech and language targets while slaving away in the kitchen, in addition to opportunities for teaching children some useful and necessary life skills. This post has some ideas and is separated into sections based on the therapy focus. Feel free to share this information with your own students' parents. I have compiled this information in a (FREE!) downloadable handout that is available here.


LANGUAGE
  • Vocabulary: Cooking provides multiple exposures to novel ingredients and utensils. Vocabulary like grater, zest, sage, baste, whisk (etc.) is not commonly used in every day conversation, so you will be able to introduce your child to these new concepts by having them help you out while preparing Thanksgiving dinner.
  • Following Directions: This skill automatically gets targeted when following a recipe.
  • Sequencing: Following a recipe provides an opportunity to work on sequencing skills. Talk to your child about what to do first / next / last.
  • Describing: Exposure to a large variety of ingredients and dishes will allow you to work on describing them. You can talk about textures, smells, tastes, as well as physical appearance of a specific food item.
  • Categorizing: You can practice categorization skills by grouping the ingredients for a particular recipe by food group: dairy, meat, vegetable, etc. For younger children, you can have them sort by size or color.
  • Answering Questions: You can work on targeting simple Wh-questions during and after the meal preparation process. What ingredients do we need? Who helped you? Why did we need to measure? How many eggs do we need? When do we need to take the turkey out of the oven? Where is the oil? etc.
  • Listening Comprehension: You can read the recipe to your child and have them tell you what they remember.
  • Narrating Personal Events / Recall: Have your child explain to someone how they helped out in the kitchen and / or how they prepared a particular dish.
  • Problem-Solving: Throughout the cooking process, ask your child questions that will stimulate their critical thinking skills. How can we keep the lemon seeds from falling into the juice? How can we separate egg yolk from egg white? How can we make a triangle out of this square cheese slice?
ARTICULATION
  • Word level: Have the child find ingredients that have their speech sounds and have them practice saying it out loud.
  • Sentence level: If the child is a reader: have them read the recipe to you while paying attention to their speech sounds.
  • Conversation level: Encourage the child to use their best speech sounds while having a Thanksgiving dinner conversation.
 
SOCIAL SKILLS
  • Taking Turns: Practice taking turns during dinner preparation.
  • Perspective Taking: Have your child help set the table -- have them think about who is coming to dinner and how many plates will be needed.
  • Conversation Skills: Thanksgiving dinner is a great opportunity to practice working on conversation skills (eye contact, turn-taking, topic maintenance).
  • Manners / Etiquette: Thanksgiving dinner also lends itself for targeting manners -- frontload your child prior to dinner by talking to them about etiquette: chewing with their mouth closed, not taking the last food item without asking, etc.

Of course these ideas are applicable year-round. If you have any ideas to add, feel free to leave a comment!
~Viola

November 6, 2014

Getting to Know My Social Skills Group

For the past few weeks the students in my social skills groups and I have been doing activities to get to know each other better. There are tons of ice breaker activities out there, but one of my favorite ones is my "Jelly Bean Get-to-Know-You" game, which is also part of my Jelly Bean language activities on TPT.

The lesson / discussion itself revolves around the fact that we usually choose the people we want to be friends with based on their interests. We tend to choose people who are most similar to us. Since we don't know much information about an individual just by looking at them, we need to get to know them better by asking questions and sharing information about ourselves.

For the activity, I prepare a little snack baggy with about 10 different colored jelly beans (they have to be Jelly Belly) for each student -- I handpick the beans prior to the activity, so that there is equal color representation. Each student receives one of these baggies in addition to a Jelly Bean "Get-to-Know-You Chart". Each color jelly bean has a little cloze statement next to it, such as, "My favorite movie is ___." We go through the chart and for each color the students have to check their bags for a match. If they have the color in their bag, they get to share the little tidbit of information about themselves. At the end of the activity, you could ask the group questions like, "Who remembers something about (Student)?" You could even hand out bonus jelly beans to those students who were truly listening to their peers and remember the most information. You can also have students compare themselves to the other kids and ask questions such as, "Who in this group are you most similar too?"

The kids love this activity because it involves candy. Thankfully, Jelly Bellys are peanut free!
~Viola

November 2, 2014

Educational Insights Game Review: The Riddle Show

Get it here!
Note: This post contains affiliate links.

If your caseload is anything like mine, you will have tons of kids who have difficulty understanding humor and/or inferences. This is why I was really excited about "The Riddle Show" by Educational Insights. "The Riddle Show" is an electronic toy shaped like a microphone that tells a variety of riddles, jokes, and tongue twisters at the push of a button. Perfect for an SLP's caseload! And of course, because it is quite different from the usual picture cards, the kids loved it!

The microphone essentially has four buttons that serve the following functions: (1) Tell a riddle, (2) Tell a riddle joke or tongue twister, (3) Answer, and (4) Repeat.

The riddles are a set of clues that students have to guess a "mystery item" for. An example might be, "I eat bugs. I have 8 legs, and I spin a web. What am I?" To check the answer, students press the answer button. On the other hand, the riddle jokes are something along the line of "What do frogs do with paper?" - "Rip-it, rip-it, rip-it" (again, students press the answer button to check). At random intervals, the joke button will also yield a short tongue twister (e.g., Jolly jugglers juggle jacks). If you need the item repeated, you simply press the repeat button. Overall, the microphone plays a variety of 145 of these.

As a bonus, the microphone actually works (think along the lines of the toy microphones you can purchase at the dollar store that make your voice echo)! It also lights up and has some silly sound effects. "The Riddle Show" runs on 3 AAA batteries, which are included in the initial purchase and is recommended for ages 6 and up.

My students really liked this, and even though they didn't get the jokes, they couldn't get enough! One drawback was that the volume was somewhat soft (even at the "high" setting). However, I used this to my advantage, as it really forced my students to listen closely.

This is a great toy to pull out once in a while to work on these targets!
~Viola

October 30, 2014

Halloween Craftivity: Mummies

Halloween is almost upon us, which means that time is running out for preparing an extensive seasonal activity. If you are still looking for a last-minute thing to do with your kiddos, this craftivity takes little prep and materials that are readily available in a school.

You will need:
* cardstock
* masking tape (found some at the dollar store)
* googly eyes
*glue

I bought two books featuring mummies this year: "Where's My Mummy" by Carolyn Crimi and "Skeleton Meets the Mummy" by Steve Metzger. I read one of these books with my groups (I mixed it up - some groups got to listen to the Crimi book, other groups got the Metzger book). We worked on listening comprehension and vocabulary. Afterwards, we made mummies by taping strips of masking tape onto a pre-cut construction paper body. Last, we glued on the eyes. Easy!

This would also be a great activity for artic groups: students receive a piece of tape after producing their sound x number of times.
~Viola 

October 29, 2014

Halloween Sale

I just wanted to make a quick announcement: all of my Halloween-themed products on TPT will be 15% off October 30th and October 31st! Click on the picture to be redirected to my store!
http://www.teacherspayteachers.com/Store/Miss-Vs-Speech-World

October 28, 2014

Monster Slime!

Monster slime!
After having been out sick with a cold yesterday (courtesy of some of my Speech kiddos, I'm sure...), the Halloween festivities are continuing this week in my Speech room. I am doing a very special activity with my 4th/5th graders in the same vein as my Witches' Brew potions: we are making Monster Slime! The ingredients are inexpensive and readily accessible, which made this activity relatively easy to throw together.

Using the template of my Witches' Brew recipe, I copied and pasted this slime recipe.  In addition to these ingredients, we also added craft googly eyes to increase the creepiness factor. I made sure to go over safety with my students when handling Borax -- because of this key ingredient, this activity works better with older students, and adult supervision is required.

As with the Witches' Brew, this was a great introductory lesson to using measuring cups and spoons. We didn't have bowls, so we used two large plastic cups instead. We also made sure to use warm water, so that the glue and borax would dissolve more easily. Students worked as a team to follow and complete the instructions in the recipe. Once we had made our slime, we transferred it into small Dixie containers and taped on these cool FREE labels from TPT. You could also place the slime in a plastic Ziploc bag. Of course my students got to take their creepy creations home.
 
We talked about vocabulary, such as "ingredients, measuring, add, mixture, consistency, texture, stir, dissolve, label, toxic, sprinkle, liquid," etc. This was a fun and motivating lesson for the kids, and taught useful life skills. And we made some great memories, too!

I think this recipe would be even more fun if using the glitter glue by Elmer's, but it is $3 per bottle. Maybe adding glitter to the mixture would work?

Another fun variation would be to use red food coloring and calling the mixture "brain matter". Gross!
~Viola

October 26, 2014

Halloween Social Skills Activity

Available on TPT.
One of the things that I am always in need of are new materials to target social skills and problem-solving. I figured that Halloween brings with it some unique or unusual situations in which students may need to problem-solve, so I created a bunch of scenarios.

To make this activity more motivating, I presented them in a game format: Each student receives a candy bucket that they will have to fill. Each scenario depicts a piece of candy of a different color. On their turn, the student picks a card and tries to solve the problem on the card. The cards include scenarios such as:
  • 
    Example of game play.
    Amanda is going trick or treating. In front of one of the houses, there is a filled candy bowl with a sign that says, “Take one.” Amanda takes almost all of the candy and puts it into her bag. What did Amanda do wrong? Why were her actions wrong?
  • Eric is going trick or treating. In front of one of the houses there is a large dog tied up right next to the door and it is growling at him. Should Eric go up to the house? Why or why not?
  • Hailey is participating in a costume parade at her school. A classmate accidentally steps on her costume and it rips. How could this problem have been prevented? What could Hailey do?
  • Jane is going trick or treating. A man opens the door and says, “I have a bunch of candy. But you have to come inside the house so I can give you some!” What should Jane do? Why?
 If this game sounds like a fit for students on your caseload, you can find it in my TPT store.
~Viola

October 21, 2014

Halloween Articulation Words

I came up with a super easy, cheap, and fast Halloween articulation activity. There's not much to it, but if you are out of time / too lazy to prepare something more extravagant, this last-minute activity may be for you.

I needed a quick Halloween-themed thing for my next artic group. I simply placed a parchment paper template (check TPT, Google images) and placed it into a word doc. I placed a table with hidden borders over it to create  lines on the paper and put the title "Halloween Words" on top (I found that the Blackadder ITC font that comes with Microsoft Word looks pretty Halloween-ish). I then printed out a copy for each student.

When the students came in, I asked them to brainstorm as many words with their target sound that have to do with Halloween. My s/z group had a lot of fun trying to fill up their lists. We then practiced the words from this list. This is a great activity to help younger students increase their awareness of their targets within words.

I almost felt guilty because this was so easy!
~Viola

October 19, 2014

Brewing Up Some Language

http://www.teacherspayteachers.com/Product/Witches-Brew-Halloween-magic-recipe-labels-baking-soda-vinegar-1505501
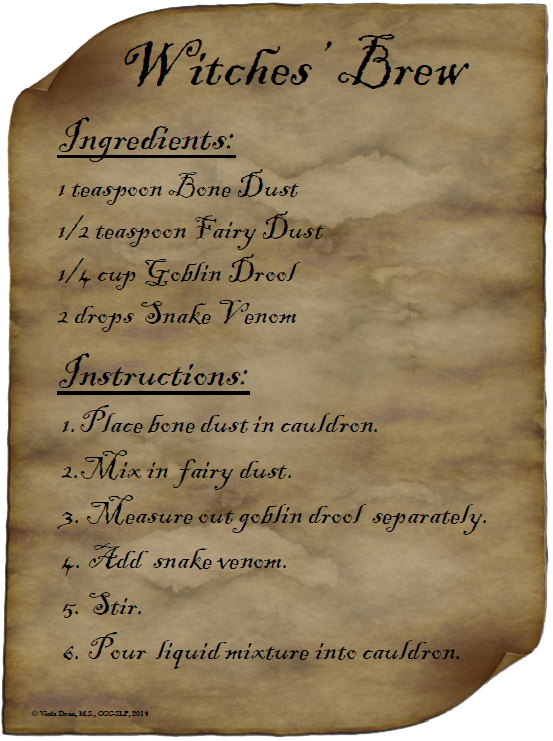
This ancient recipe came from a
magic book.
Note: This post contains affiliate links.

I think this year I cracked the Halloween jackpot with my students: We are brewing up some bona fide witches' potions in the Speech room with an authentic magic recipe. Okay, maybe it's not that authentic, but my students believe it is. It really is just the good ol' vinegar and baking soda experiment with a spooky twist to it.

I purchased some miniature cauldrons (available on Amazon and Oriental Trading), which gave me the idea for this activity.

I found some parchment paper templates online and used these to create an ancient-looking recipe titled "Witches' Brew" (the Blackadder ITC font in Word lends itself well to this). The recipe's ingredients are truly mystical: it calls for "bone dust" (baking soda), "fairy dust" (glitter), "goblin drool" (vinegar), and "snake venom" (green food coloring).

Using the parchment paper template, I also created labels for each of these ingredients. These labels were taped onto each of the corresponding materials.

When students arrived to their session, we read the book "Witches" by Cheryl Christian, a beautifully illustrated rhyming book about witches' antics. I then told the students that I had found a witches' recipe in an old magic book in the library. The students were amazed! And they kept asking me where I had gotten these weird ingredients. Well, truth be told, some of my older students questioned whether this recipe was real, but they still had a blast! Using measuring cups and measuring spoons, students had to follow the recipe's instructions to create their "Witches' Brew".

http://www.teacherspayteachers.com/Product/Witches-Brew-Halloween-magic-recipe-labels-baking-soda-vinegar-1505501
Click on the picture to get the recipe and labels on TPT.
This activity was an awesome "life skills" lesson, as it provided an opportunity for the kids to be introduced to different abbreviations (tsp./tbsp.) and measurement tools. They also had to learn how to read the numbers (1/4, 1/2) and find and use the correct measurement tool. It was amazing how many of my students have never used these kitchen utensils! To mix in some language practice, we targeted new vocabulary ("ingredients", "ancient", "dust", "drool", "venom", "cauldron", "stir", "measure", "teaspoon vs. tablespoon", etc.). This also makes a good articulation carry-over activity, and you can have students read the recipe using their good sounds.

We also talked about the different smells and looks of the ingredients, and made predictions about what might happen when we mix the ingredients together (a common guess was that the potion would "explode"). After the activity, I had students guess what they thought the ingredients really were.

My students had a blast!
The kids had so much fun with this! I think this activity created some lasting memories for them. I bet that next year they will ask me if we can do this again (which is usually a good indicator that an activity was successful)!

If you would like to do this activity with your groups, I posted the recipe, labels, and an observation form for a buck fifty on TPT. Just be aware that you will have to purchase additional materials: miniature cauldrons, the ingredients, measuring utensils, and a tray to catch the mess (I found the clear cup, measuring cups/spoons, vinegar, and tray at the Dollar store). Worth it!
~Viola

October 18, 2014

Playroom Entertainment Game Review: Saddle Up!

http://www.amazon.com/Playroom-Entertainment-73200-Saddle-Up/dp/B004FFFD9Y/ref=sr_1_15?ie=UTF8&qid=1413653744&sr=8-15&keywords=saddle+up
Get it here.
Saddle Up! by Playroom Entertainment is a quick card game that requires logical thinking and relies on students' visual processing skills. It would also be a great game to complement a farm / cowboy / horse theme in your classroom setting. This game can be played with 2 to 6 players and the recommended age range is 5 years and up (although it may be challenging for young players).
Example of game play.

The game consists of 50 cards, each of which depicts four horse-related object in four different colors. The object of the game is to place your cards in such a way so that no two identical colors or objects are touching. As with most Playroom Entertainment card games, there are multiple variations of play, which allows you to be flexible with the level of difficulty.

Incorrect card placement (the
arrows indicate the mistake).

Version 1: Set up a starting grid of two adjacent cards and put the remaining 48 cards in a pile. A player flips over two cards from the pile. The first player to identify where to place one of the cards correctly on the starting grid keeps the second card as a point. The player with the most points wins. If a player identifies an incorrect place, they lose a turn in the next round and relinquish one of their points.

Version 2: Shuffle all of the cards. Each player receives 7 cards and the remaining cards are discarded. All the players then race to create a grid using their seven cards while observing the rules. The first player to create a correct grid is the winner.

Version 3: Shuffle all of the cards. Each player receives 7 cards and one card is placed face up in the middle of the table. The remaining cards are discarded. All of the players simultaneously  look for a position on the grid to place their card. The first player to play all of their cards is the winner.

Of course you could also play the game after the rules of "Uno", and have players take turns playing a card. If they can't go, they draw a new card. The first player to play all of their cards is the winner.

I actually found this game quite challenging! It is easy to overlook a picture and make a mistake. This makes it a good game for children who are working on visuo-spatial processing  and impulse control. Because this game is quite affordable, it would also be an excellent stocking stuffer!
~Viola

October 15, 2014

Jack O'Lantern Magnets

Sometimes I think I love Halloween as much as my students!!! Having grown up in Germany, we did not have this holiday (although it's been gaining popularity in the last few years), so I was always intrigued as a child, wishing I could get dress up in a scary costume and get free candy, too. I guess I am making up for this lost childhood dream by doing cool activities with my kids at school!

I have all sorts of fun activities planned and will be posting about our speech sessions for the next few weeks. This week, I made Jack O'Lantern magnets with a bunch of my groups. This project was relatively inexpensive (less than $20 for almost my entire caseload) and the kids loved it. The magnets are surprisingly easy to make, although 1st graders and below may need a little assistance (hot glue is involved!).
Some of our finished magnets.

To make this endeavor therapeutic, I paired this activity by reading a pumpkin-themed story prior to making the magnets. I read "Pumpkin Jack" by Will Hubbell with my older students and "Big Pumpkin" by Erica Silverman with my younger groups. My language groups worked on answering comprehension questions, and my articulation groups worked on saying words from the book that contained their sounds.

The magnets didn't take very too long to make (10-15 minutes depending on the group), so this worked out well.

You will need the following materials:

* Large decorative glass gems (available near the floral section at Michaels -- make sure to use their online 40% off coupons!)
* Orange construction paper
* Green pipe cleaner
* Magnets (available at Michaels)
* Pencil
* Sharpie
* Scissors
* Hot glue gun

See the instructions on the left to find out how it's done.


A 5th grader hard at work.
To make this easier, I pre-cut 3"x3" construction paper squares prior to this activity. The kids had tons of fun designing scary or silly faces, and although many of them were a little wary about the hot glue gun, they were willing to give it a try with my assistance (I held down the pumpkin face while they squirted out the glue).

I got lots of exclamations along the lines of, "This is so much fun!" and "Did you say I can take it home?!" One 4th grader was even astute enough to ask me whether I had gotten this idea off of Pinterest. Why yes, I did! The original pin can be found here.
~Viola

October 11, 2014

Halloween Inferencing Activity

With Halloween drawing close, I figured I should share some of the themed activities that I created for my students this year. I do have quite a few groups working on logical thinking, listening, and inferencing skills, so I love doing "riddle" type activities with them. My Easter Egg Inferences were a pretty big hit with my students, so I figured I should create a similar activity with a Halloween theme.

http://www.teacherspayteachers.com/Product/Halloween-themed-Inferencing-Activity-Guess-the-mystery-item-Speech-therapy-1388927
Halloween Inferencing - get it here!

The activity consists of 54 gravestone cards, each of which features three clues. Students then have to guess what lies buried in this spot. To check their answers, they flip over the card to reveal a picture on the back. Several of the cards feature Halloween-themed objects, alongside common every-day items. Blank cards are included so you can add your own! If you teach large groups, it might be fun (or macabre!) to have student pictures on the back and write clues about them onto the gravestone. The riddles are fairly easy and would probably be most appropriate for Pre-2nd grade, depending on students' cognitive levels. You can also adapt the activity by playing in any of the following ways:

• Simply read clues and have students guess what the item is.• Place all the picture cards on the table, then read clues and have students find a corresponding picture.
• Give students points based on how many clues they needed (e.g., one clue = 3 points, two clues = 2 points, three clues = 1 point).
• Show students the picture card first, then have them come up with possible clues that might be on the card. Give points for correct guesses!


Just something fun for October. You can find this activity (priced at $3) in my TPT store.
~Viola